노트
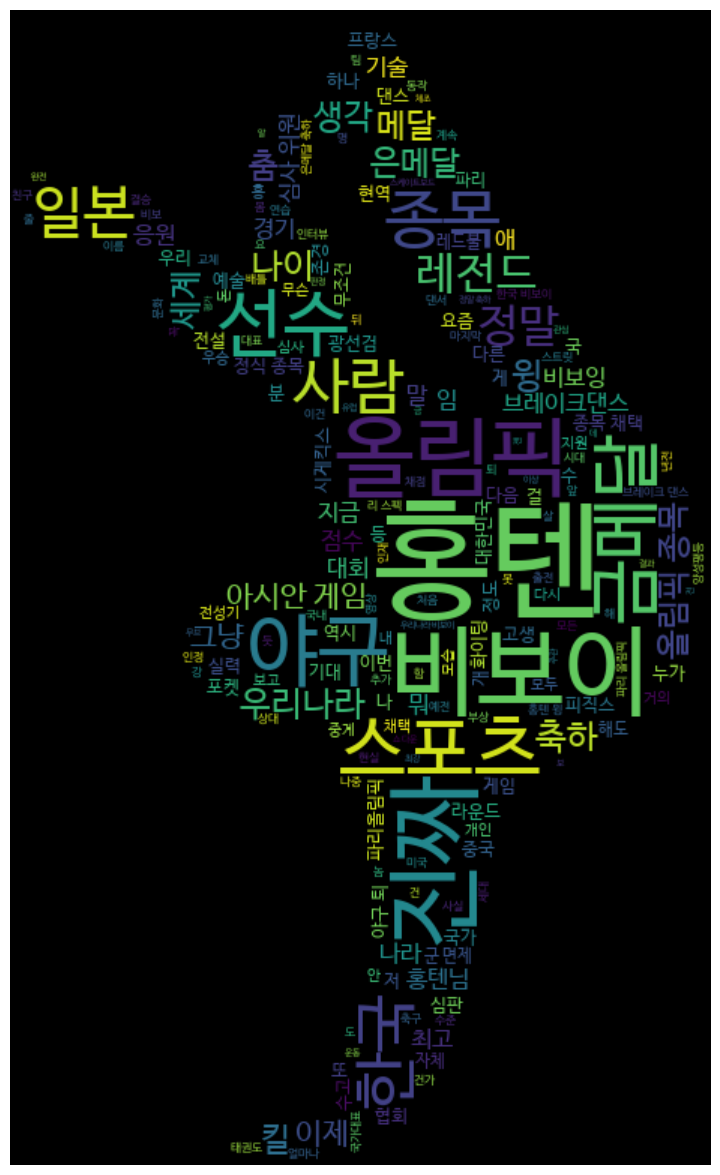
selenium과 BeautifulSoup으로 유튜브 댓글을 수집해 워드클라우드 만들기
이 글은 한국어로만 있습니다
유튜브 댓글은 스크롤해야 로드되므로 scrollHeight가 더 이상 변하지 않을 때까지 반복 스크롤한 뒤 page_source를 파싱한다. 댓글 노드는 ytd-comment-thread-renderer, 본문은 그 안의 yt-attributed-string#content-text 다. 이 선택자는 유튜브가 DOM을 바꾸면 그대로 깨지므로, 크롤러를 오래 쓰려면 선택자를 상수로 분리해 두는 편이 낫다. 한국어 분석은 KoNLPy Okt로 명사만 추출하고 불용어를 거른다.
지인이 대학원 논문을 써야 하는데 유튜브 댓글을 수집해야한다고 해서 호기롭게 해준다고 해놓고 꽤나 헤맸다ㅋ
처음에 google colab으로 진행하다가 계속되는 이슈에 pycharm 설치… 어디서부터 손을 대야 할 지 몰라서 anaconda 설치 후 jupyter 로 진행했다.
!issue
유튜브 내 코드가 수시로 바껴서 댓글수집할 때 애를 좀 먹었다. 어제 됐던 코드가 안된다던지 하는 경우가 발생했다. 유튜브 댓글 크롤링 시에는 웹 상 코드도 틈틈히 봐주면서 수정해야할 것 같다.
상세 코드
##############################luna##############################

# matplotlib의 inline 백엔드를 활성화하여 Jupyter notebook 내에서 그래프를 바로 볼 수 있게 함
%matplotlib inline

# 필요한 라이브러리들을 임포트
from selenium import webdriver
import time
from bs4 import BeautifulSoup
import pandas as pd
from selenium.webdriver.support.ui import WebDriverWait
from selenium.webdriver.common.by import By
from selenium.webdriver.support import expected_conditions as EC

# 브라우저를 GUI 없이 실행하는 headless Chrome 설정
options = webdriver.ChromeOptions()
options.add_argument('--headless')
options.add_argument('--no-sandbox')
options.add_argument('--disable-dev-shm-usage')

# 위에서 설정한 옵션으로 Chrome WebDriver 인스턴스 생성
driver = webdriver.Chrome(options=options)

# 분석할 YouTube 동영상 URL들을 리스트로 정의
urls = [
    "https://youtu.be/i6K8i9BMr14?si=tbzezCAiHguzpzyb",
    # 나머지 URL들...
]

# 모든 동영상의 댓글을 저장할 빈 리스트 생성
all_comments = []

# 각 동영상 URL에 대해 반복하여 댓글 수집
for url in urls:
    # 해당 URL의 웹 페이지 로드
    driver.get(url)
    # 암묵적 대기
    driver.implicitly_wait(3)

    # 페이지 맨 아래까지 스크롤하여 댓글 섹션 로딩
    last_height = driver.execute_script("return document.documentElement.scrollHeight")
    while True:
        driver.execute_script("window.scrollTo(0, document.documentElement.scrollHeight);")
        time.sleep(2)  # 필요에 따라 대기 시간 조정
        new_height = driver.execute_script("return document.documentElement.scrollHeight")
        if new_height == last_height:
            try:
                # '더 보기' 버튼이 있으면 클릭
                dismiss_button = WebDriverWait(driver, 10).until(EC.presence_of_element_located((By.CSS_SELECTOR, '#dismiss-button > a')))
                dismiss_button.click()
            except:
                break
        last_height = new_height

    # 스크롤 후의 HTML 소스 가져오기
    html_source = driver.page_source
    # BeautifulSoup으로 HTML 파싱
    soup = BeautifulSoup(html_source, 'html.parser')

    # 댓글 섹션에서 댓글 추출
    comments_section = soup.find_all('ytd-comment-thread-renderer')
    for comment in comments_section:
        comment_text = comment.find("yt-attributed-string", id="content-text").text.strip()
        all_comments.append(comment_text)

# 브라우저 종료
driver.quit()

### 특수문자 제거하기 ###
import re
compile = re.compile("[^ ㄱ-ㅣ가-힣]+")
for i in range(len(all_comments)):
    a = compile.sub("", all_comments[i])
    all_comments[i] = a

### 문장 분석 ###
from konlpy.tag import Okt
okt = Okt()
result = [okt.nouns(i) for i in all_comments] # 댓글에서 명사만 추출
final_result = [r for i in result for r in i]

### 불용어 제거하기 ###
stop_word = ["더", "킹", "것", "때", "년", "왜", "브레이", "그", "좀", "거", "이"]
final_result = [i for i in final_result if i not in stop_word]

# 불용어 제거 결과 출력
print('불용어 제거', final_result)

## 한국어 top 30 단어 출력 ##
korean = pd.Series(final_result).value_counts().head(30)
print("top 30")
print(korean)

# 댓글 내용을 포함하는 DataFrame 생성
youtube_df = pd.DataFrame(final_result, columns=['댓글 내용'])

# 워드 클라우드 생성을 위한 텍스트 데이터 준비
text = " ".join(li for li in youtube_df['댓글 내용'].astype(str))

# matplotlib.pyplot을 plt라는 이름으로 임포트하여 시각화 기능을 사용할 수 있게 함
import matplotlib.pyplot as plt
# wordcloud 라이브러리에서 WordCloud, STOPWORDS, ImageColorGenerator를 임포트
from wordcloud import WordCloud, STOPWORDS, ImageColorGenerator

# 워드클라우드에 사용할 한글 폰트 경로 설정
fontpath = './NanumBarunGothic.ttf'

# PIL 라이브러리에서 Image 모듈을 임포트하여 이미지 처리 기능을 사용할 수 있게 함
from PIL import Image
# numpy를 np라는 이름으로 임포트하여 배열 관련 연산을 수행할 수 있게 함
import numpy as np

# 마스크 이미지 로드 및 색상 반전 과정
# 마스크로 사용할 이미지 파일을 열어 Image 객체로 생성
mask_image = Image.open("./kang_freeze_fi.png")
# Image 객체를 numpy 배열로 변환하고, np.invert 함수를 이용해 픽셀 값의 색상을 반전시킴
mask_image = np.invert(np.array(mask_image))

# 워드클라우드 객체 생성
wordcloud = WordCloud(
    background_color = 'black',  # 배경 색상 설정
    width = 1000, height = 700,  # 워드클라우드 이미지의 너비와 높이 설정
    font_path = fontpath,  # 한글 폰트 경로 설정
    mask = mask_image  # 워드클라우드 모양을 결정할 마스크 이미지 설정
).generate(text)  # 워드클라우드를 생성할 텍스트 데이터

# matplotlib의 subplots 함수를 이용하여 그림과 축을 생성, figsize로 그림의 크기를 지정
plt.subplots(figsize = (25, 15))
plt.axis('off')  # 축을 표시하지 않음
plt.imshow(wordcloud, interpolation = 'bilinear')  # 워드클라우드 이미지를 화면에 표시, interpolation은 이미지가 부드럽게 보이도록 함
plt.show()  # 생성한 워드클라우드를 화면에 출력
결과